Saturday, 13 June 2015

Bleeding Tissue Technique - First Attempt (1 of 3)


Hello and thank you for your visit

A couple of weeks ago I was invited to a friends house and our friend Margaret came along to show us all how to do the Bleeding Tissue Technique.

We used a glossy card and all chose our coloured die cut pieces of tissue from a big glass jar.  Under Margaret's guidance we placed the pieces randomly, put on water with a paint brush then had coffee and biscuits while we gave the tissue several minutes to do it's work!

It was almost magical to remove the tissue and see the random colour on the card and it  was interesting to see how differently they turned out as all five of us had chosen different colour combinations.

We then had to decide if we would use purple, black or this dark blue ink to add the small circles which we rubbed through a mask.  Then we each decided which mask we would use as our main image to sponge over the top.  We finished by putting on a few white circles with white acrylic paint and a small bottle top.

Everybody's finished piece looked very different because of the choices we had made and although I was delighted to have learned this new and exciting technique in honesty I did think mine looked a little bit messy.

However, undaunted, when I got home I decided to make it into a card.  I heat embossed the sentiment and added three sparkly gems.  I'm really pleased with the result.  But this wasn't the where I finished .....

I would like to enter this card into The Crafter's Cafe Challenge "Anything Goes". 


scraps (2 of 3)

These are a few of the scraps that were left when I'd trimmed my work to make it into a card.

As I thought they looked quite pretty and interesting I decided to use the scrap to make another card - so please scroll down .... 

"Hello" - Paper Weaving (3 of 3)


I cut the scraps roughly in half and wove them together, stuck them onto white card then mounted onto black and cut the corners with an X Cut corner punch.

It was all stuck onto a white card and I added  "Hello" which is a Clearly Besotted die that I cut out twice in white and once in black to add some depth.

I finished by putting on the clear gems to give a bit of sparkle.

I really enjoyed learning this technique and have ordered some of the Spectre tissue paper so that I can do more.

A Big Thank You Margaret.

p.s.  I also took the tissue that I'd used for the demo home and used it again.  I'll show you that card another time so do please visit again.

Friday, 12 June 2015


Good Morning and hope you have a happy Friday.

I am waiting for some Sizzix die sets to arrive shortly so I'm looking forward to having some playtime up in my cabin later on today.

I made this card a couple of weeks ago and coloured the image with my Spectrum Noir pencils which I'd not used before.  I think I might have given him a little more shading but he really is a cutie isn't he.

I love this dear little Penny Black dog and thought he would be perfect for entering into the Cutie Pie Blog Challenge which is currently  "Cats and Dogs".

The papers are from my stash and the flowers punched out, shaped and inked around the edges.

The sentiments are from a set by Paula Pascal.  I finally added a little Glossy Accents to the dog's nose.

Wednesday, 10 June 2015

For Derek


Happy Tuesday to you and thank you for visiting.

I've made this card for my husband's cousin who is retiring this month.  I think he's counting the days down now!  Happy Retirement  Derek. xx

This is my first attempt at triple stamping and it's something I've been meaning to try for a while.

I used a Hero Arts stamp set for the images and "It's a Special Time" sentiment which I stamped with a versamark inkpad and embossed with detail silver embossing powder.

I added the dark blue and tartan ribbons and the silver brad, all from my stash.

I would like to enter this in the Really Reasonable Ribbon blog challenge and Try it Tuesday Challenge "Clocks and Watches"

Tuesday, 9 June 2015

Baby Girl


Good evening to you.  I do hope you've had a good day.

I had a lovely morning doing a workshop but this afternoon I made this baby card for my June charity box.

The stamp I used is one of a set from Stampers Anonymous "Mini Blueprints" 8 cms231 which I bought a couple of weeks ago and haven't used before.

I stamped the  main image with Memento, London Fog, then stamped the sentiment underneath with Versamark and heat embossed with silver detail embossing powder.  The wheels were coloured with a pale grey and the heart with a pink marker pen.

The image was cut out with a Spellbinders die and then stuck onto silver mirror card which had been cut out with a Spellbinders scallop die and foam pads put onto the back.

The banners were cut from scraps of matching paper from my stash and stuck onto some white card then attached to a pink card and then I put the topper on.

I would like to enter this card Tuesday Morning Sketches Challenge.


Monday, 8 June 2015

Feathered Friends


This is a photo taken through my cabin window yesterday afternoon while I was doing some card making after we got back from a delicious roast lunch at the local pub.

There was so much activity with different birds flying in to feed.

I also had a visit from two squirrels, both at the same time and later a woodpigeon and jackdaw faced up to each other as they both flew down for a drink from the birdbath.

The feeder is only a few feet from my window so I spend lots of time watching them while I'm crafting.

I did manage to make several cards too!


Saturday, 6 June 2015

Ahoy There!


Hello and Happy Saturday!

Yesterday evening  I was lucky enough to go to a card class with Louise Brooks as she had a couple of girls who were unable to attend.

Anyway, we made three cards plus three toppers that just needed mounting when we got home.

They were all very different and I liked them all very much.  This is probably my favourite.

We used Clearly Besotted stamps with the matching dies.  The 'sea' was stamped with a red rubber oval chevron stamp (I forgot to ask what it was)  and the gem was added for a bit of sparkle.   The inks used were Adirondack.

It was a very enjoyable evening and Louise made us eat cake too!!!

Thanks for visiting and please do come back again soon.

Friday, 5 June 2015

Happy Stitching

Hello Everybody.

I hope you've been enjoying the beautiful weather we've had here today.

This afternoon I made this stitched card, which is one of the techniques that my husband likes best.

I used a Papermania plastic template and marked lightly through the holes with a pencil.  At this stage a lot of dots on the page look very confusing so I joined up the dots to make each letter stand out clearly.

 I coloured the flower and leaf with Pro markers, added a little Sakura starlight pen for sparkle (which doesn't show on the photo) and then stitched the design using 6 strands of embroidery thread throughout.  The ribbon is from my stash and the button was from a bag of mixed buttons that I bought from The Works.

I would like to enter this card into the Crafty Cardmakers and More challenge "Stitching Faux or Real"


Tuesday, 2 June 2015

Lady in a Hat


Morning Everyone.

It's a miserable, dark rainy day here today so I'm posting a "sunny" card.  Hope you all have a "Happy Day" - crafting perhaps!

I don't know what this stamp is called.  It's one of a set of three foam stamps that I bought from QVC when they did regular craft shows.

I did a bit of paper peicing with scraps of paper from my stash then coloured the image.  I used Pro markers for the hair, and hat, and a blush of chalk for her cheeks.  The rest of the colouring is done with Sakura Starlight pens tapped onto an acrylic block and painted like watercolour with a paintbrush.

The sentiment is one I bought a long time ago in a bargain bin from Hobbycraft.

I would like to enter this card into the Alphabet Challenge blog for "H is for Hats and Handbags"  and Crafting From The Heart Challenge - Anything Goes

Saturday, 30 May 2015

quick crafty tip 1 of 2


Hello and thank you for dropping by.

Today my copy of "Papercraft Essentials" arrived together with this free gift.

When I decided to use it this afternoon I had a problem, which I often find with dies that are rather intricate,  and  in particular sentiments.

On the first cut it took a long time to release the cut card from the die and when I finally got it out everything looked very untidy and bent.

I used a trick I discovered, some time ago when I was first having this problem.

Many of you may have already discovered the magic of talcum powder .... anyway please do scroll down to see what I did.

quick crafty tip 2 of 2


 Although I managed to get the sentiment and butterfly out of the die it wasn't an easy job.  As you can see from this photo they looked very untidy  and there is even a hole in the butterfly's body where I had to poke so hard from the back to release it.

I find by putting quite a lot of talcum powder on the cutting side of the die before putting it through my Cuttlebug everything comes  out much more easily and the diecuts are much neater than those shown in this photo.  If you enlarge this photo you will see how much powder I use.  When I used the powder the die cuts looked nice and clean and tidy as shown in the picture on the previous page.

I hope some of you will find this tip helpful.


Happy Crafting!

Monday, 25 May 2015

A Perfect Day!


Yesterday my husband went to an Adobe lecture so I had the day by myself.

I had a lie in, a couple of hours crafting then pizza and a big glass of red wine watching the last Sunday football match of the season.

I've been trying to use up old stuff since the beginning of the year so I made up six cards from old decoupage.  I'd previously cut out and assembled the decoupage over several weeks at our craft club which is held every Monday morning in the village hall.

This is one of the cards I made using some Lucy Attwell decoupage that I bought from Create & Craft many years ago.  The "Hello" is a die bought recently from Greatly Besotted and  the hearts are punched out with Glossy Accents added.  The paper is from my stash.

I've submitted this card to The Cutie Pie Challenge Blog.

Saturday, 16 May 2015

Contemporary Parchment Card

I came across this card this morning checking through a box of completed cards.  It was made several years ago and I had completely forgotten about it.

It's not my usual style of parchment card but I do remember making it.  There was a lot of work involved, as with all parchment work, but I really like how it turned out and it was a lot of fun to do.

I coloured in the fans.  The leaves were cut out and that was the most time consuming part of the card.

The card insert is a piece of  brightly coloured rainbow parchment,

Saturday, 9 May 2015

Useful die sets


Just thought you may be interested to see these two very useful little die sets.

I used them on the following cards as they work well together for matting and layering.

They are a great size for using on ATCs

Now I'm really not mean - but I punched out 20 of the small gold hearts from these scraps that were left after making my cards.

Butterflies and Dragonflies


Happy Saturday Everyone.

Today I've been out crafting with a friend and had a great time.

I made eight cards like this a couple of days ago using up scraps of coloured, black, silver and gold card plus odd bits of parchment paper.

They are A6 size cards folded lengthways.  I think they are rather an elegant type of card and also don't require a great deal of decoration if you are needing some quick cards.  Unfortunately I don't have envelopes this size so have to make my own.

I wanted fantasy type images so used Dawn Bibby's "Woodland Butterfly" clear set which I stamped onto the parchment with a versamark ink pad and heat embossed with silver  embossing powder.  I  coloured in the bodies with a gold gel pen and did just a little embossing on the back of the parchment.

Fussy cutting probably took more time than anything else and a few dragonflies lost their antennae!  So I made them some more with craft wire.  Just a little spirelli with some Twinney thread  and they were almost done.

Wednesday, 6 May 2015

More Brusho


Here's the second of my Brusho practise pieces that I decided to use on a card.

This is on watercolour paper using three colours of Brusho, turquoise, scarlet and yellow paint in separate areas.  The paper was well spritzed with water before I tapped on the paints and then spritzed again.  This time I dried with my heat tool before stamping the leaf and then the flower head using a black dye ink pad.

As there was not a lot of  definition between the two stamps I outlined the petals of the flower with a fine black liner pen and drew lines on the leaves with a white gel pen.

I added a green button to pick out the green colour where paints had merged and a scrap of embroidery yarn tied into a bow for added decoration.

After matting onto a piece of black card which I tore at the bottom I stuck on a couple of self adhesive pearls from my craft stash. The sentiment is a well loved Judikins  stamp, bought a long time ago from Stamp Addicts.  The flower and leaves stamps are by Paper Artsy.


Tuesday, 5 May 2015

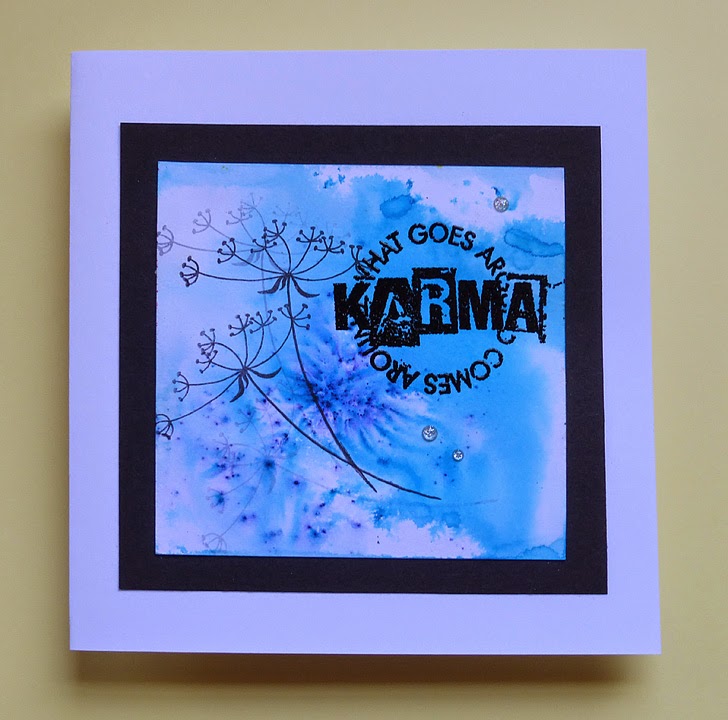
Karma


I hope you all enjoyed the Bank Holiday weekend.  I certainly did.

We  visited Aunty Stella in Cambridge, I watched lots of football and we had a takeaway Chinese meal.

Well, this is one of my Brusho samples which I decided to use to make a card.  I'm pleased with how that little scrap, in the picture below, turned out when it became a card.

I used Turquoise coloured Brusho crystals onto glossy white card.

The stamp on the left is one of a set of  Woodware stamps called Plant & Meadow JGS402.   I stamped twice and then once again without re-inking.

The sentiment, which was heat embossed is a Visible images stamp. This set is called "be happy" and comes with three other sentiments.

I added three self adhesive dew drops for added interest.

This Brusho colour is probably my favourite at the moment from the starter set that I bought.

Monday, 4 May 2015

Busho Workshop


Last week I went to a Brusho Workshop at Coleman's Warehouse in Rushden.  It was really an introduction to using Brusho paint.  These are just 3 of my sample pieces.

We used different types of card, plain white, glossy white card and watercolour paper to find out how the paint reacted on different surfaces.  Sometimes we spritzed the paper with water before tapping on the paint and sometimes sprinkled the paint on then spritzed with water.  We used either one colour, two  or three colours of paint on the different samples to see the effects we got.  There were about a dozen of us in the class and it was very interesting to see how differently our samples turned out depending on the colours we chose to use and how heavy handed we were with the spritzing.

The following day I decided to make cards from some of my samples and I'll post them over the next few days.

Now I'm afraid I have to get the ironing board out as DH is running short of shirts but after that it's up the garden to my craft cabin for a bit of playing!

Sunday, 26 April 2015

Three Quick Cards


Good Morning and Welcome.

Well it's almost the end of the month again and I needed some quick cards to fill up my charity box.

I've used an embossing folder which came free with a magazine a couple of months ago.

I used my chalks, which I've only got out again recently, to colour the embossing then attached the panels to white A6 cards.

Finally I added clear self adhesive  gems in three different sizes to the centres of some flowers and stamped the sentiment which also came free with the folders.  I made two in each colour and I'm pleased with how they turned out. My box is almost full now and will be ready to send off in a few days time.

Thank you for popping in!